Summer of Bitcoin Android Workshop

Note: this blog post is left here for archival purposes. If you’re looking to build a bitcoin wallet on Android, the ecosystem has evolved immensly since my workshop in 2021! Check out the new Android-specific Bitcoin Dev Kit library bdk-android (repository, Maven Central) and the sample application Devkit Wallet I maintain here, with documentation here.
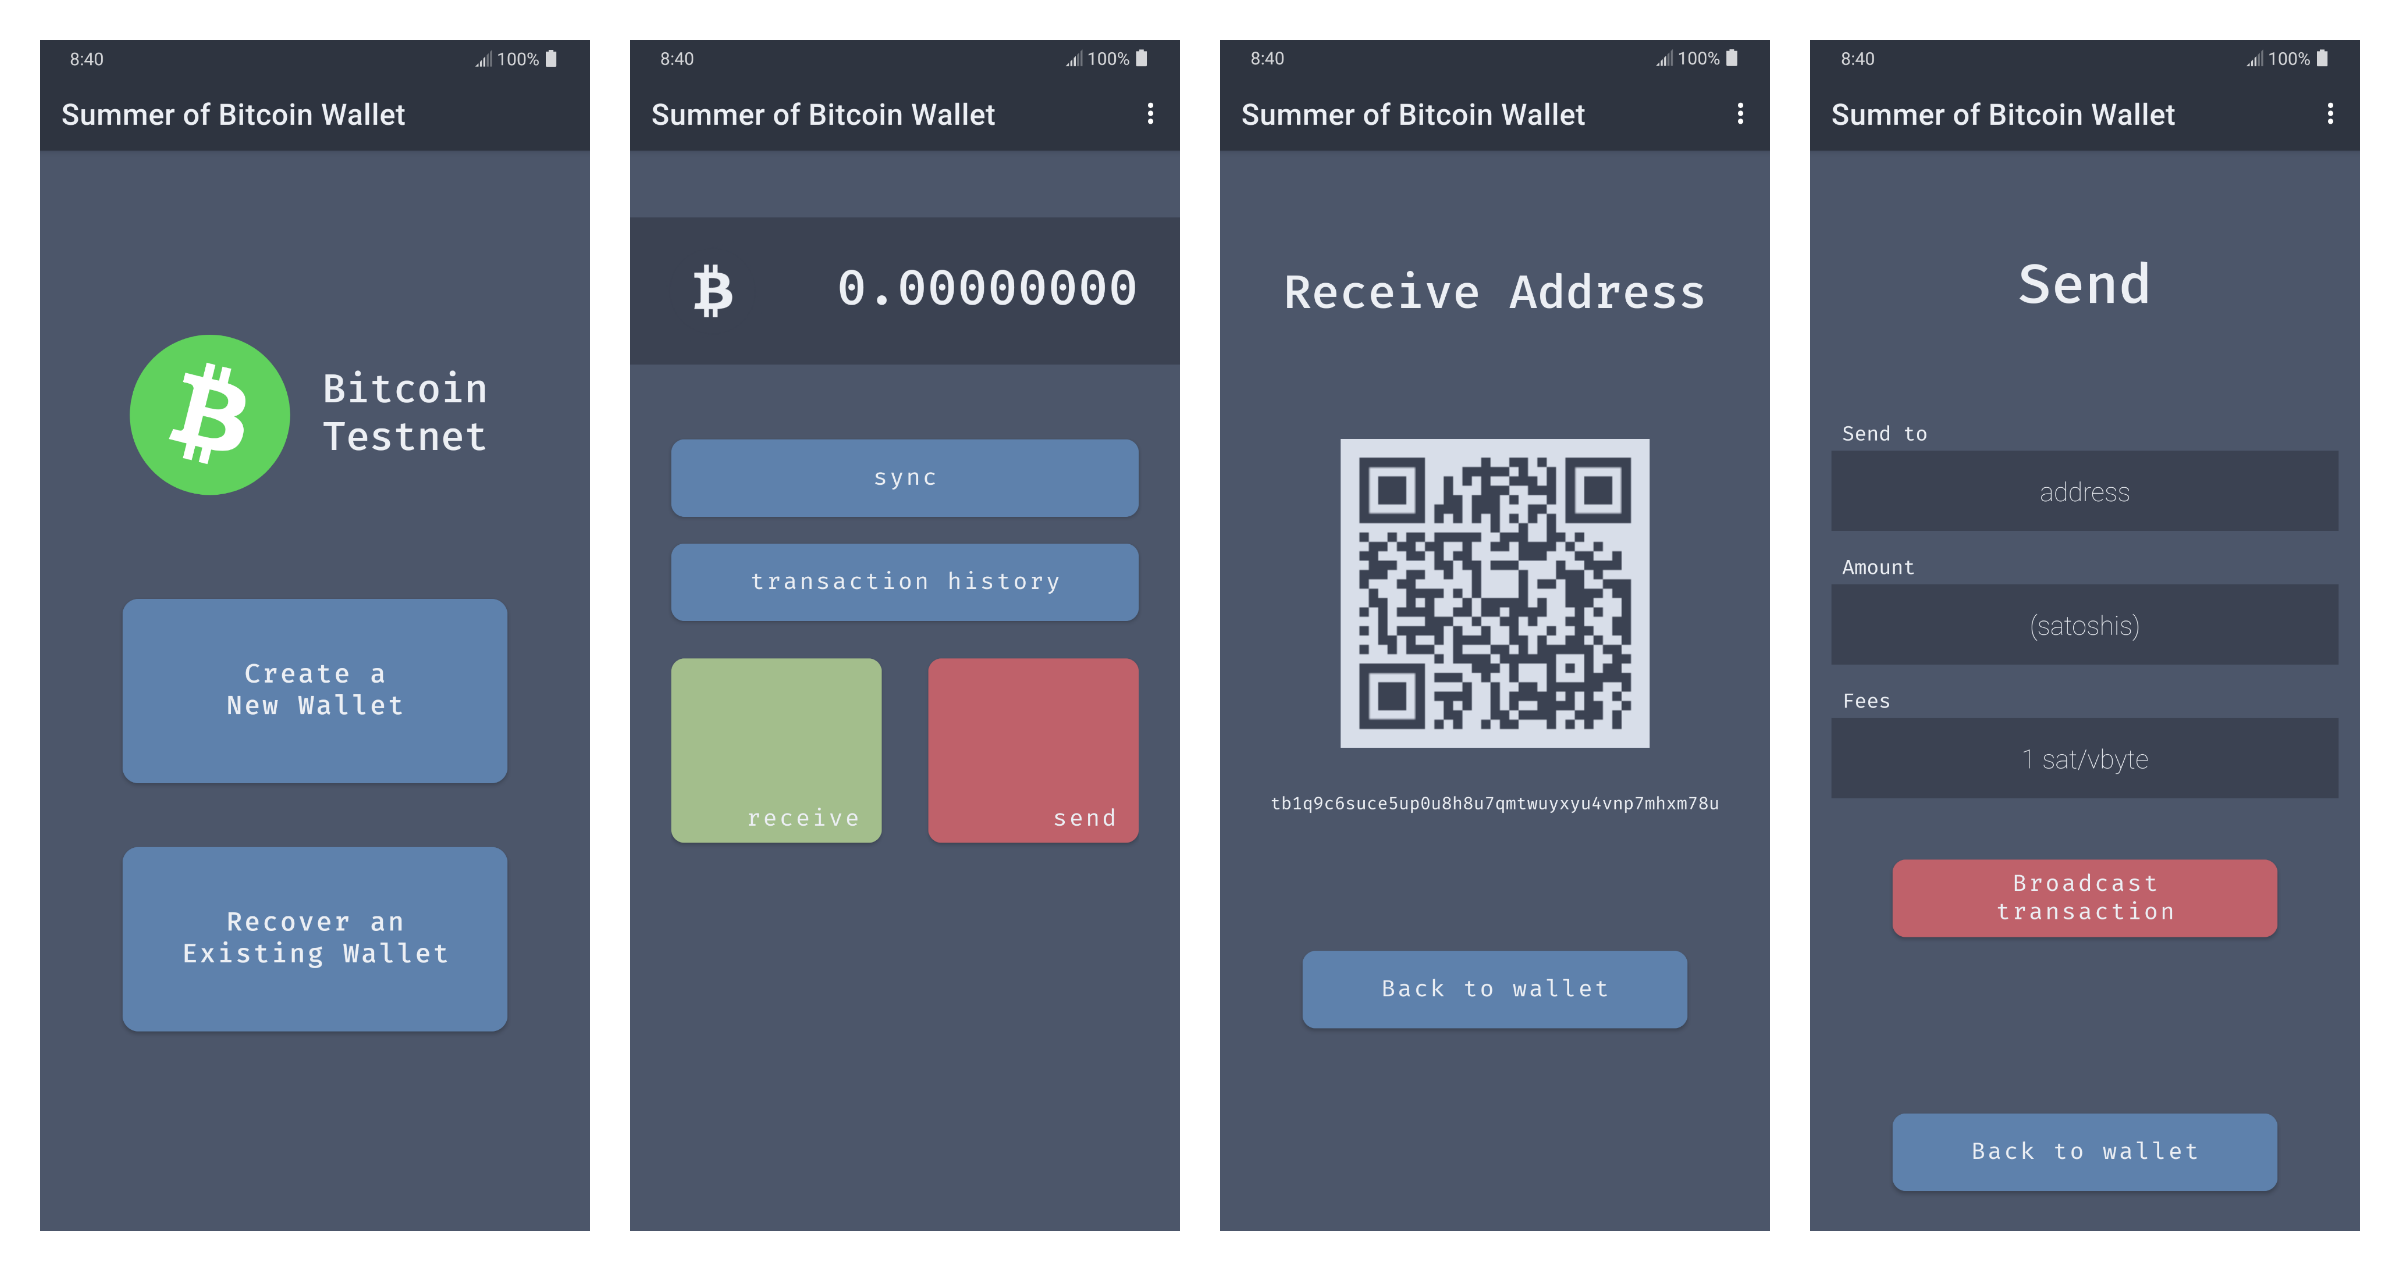
The Summer of Bitcoin Wallet is a simple testnet Bitcoin wallet built as a reference app for how to leverage the bitcoindevkit into Android applications. It is purposely lean on Android-specific bells and whistles in order to keep the focus on bitcoin fundamentals and the bitcoindevkit API.
This webpage is a walkthrough tutorial of the wallet codebase. It breaks the building of the wallet into 10 distinct tasks, each with an associated tag in the codebase. See the list of tags and tasks like so:
➜ git tag -n --list
task1           create a basic android activity
task2           build multiple activities and navigate between them
task3           add fragments to the wallet activity
task4           build the target ui
task5           add wallet and repository objects
task6           implement receive and sync
task7           implement send
task8           add transaction history
task9           display recovery phrase
task10          recover wallet
You can see and run the version of the wallet resulting after each task by checking out a specific tag like so:
➜ git checkout task1
We break the journey of building the wallet into the following 10 tasks:
- Create a basic Android activity
- Build multiple activities and navigate between them
- Build fragments within the wallet activity (wallet, transaction history, receive, send, recovery phrase, about)
- Build the target UI (layout files, colors, themes)
- Create a Wallet object with the Repository design pattern
- Implement receive and sync functionalities
- Implement send functionality
- Query and display transaction history
- Display recovery phrase
- Implement wallet recovery from BIP39 words
Prerequisites
This tutorial assumes you have a working Android development setup, including a phone you can launch the app on, or a working emulator on your development machine. It also requires you have downloaded or built the bitcoindevkit library for Android (bdk-jni). To ensure you can run through this tutorial without problems, please build both branches of the test app. The readme is comprehensive and should guide you through installing the proper software and testing the app and the bitcoindevkit library.
Task 1: Create a basic Android activity
Our first tag is the easiest to accomplish yet one of the more complicated one to understand if you are new to Android. While the goal of this tutorial is not to teach the Android framework in depth, we nonetheless need to go over the main pieces of the puzzle at play here. Note that almost all of the code at this point was generated automatically by Android Studio (you can created similar empty shell apps by choosing New Project -> Empty Activity -> [Choose options...]).
Some of the important files and directories at this point are:
1. The build.gradle.kts files
Gradle is the build tool used by Android to describe the compilation steps for your app. The build.gradle.kts files use a Kotlin Domain Specific Language (DSL) to describe those steps, and some of the configuration options.
2. Files in the app/src/main/
The main directory breaks into two major parts: the Kotlin source code files and the resources files. The Kotlin source file define behavior on the application, whereas the resouces are files like layouts, colors, strings, themes, images, icons, etc.)
3. The app/src/main/AndroidManifest.xml file
The Android Manifest file describes the activities that are registered for the app, the permissions that the app will requires (internet, camera, etc.), as well as some other metadata information necessary for the OS to start your application.
Task 2: Build multiple activities and navigate between them
You can think of activities in Android as the basic building blocks for apps. They group together multiple related “screens” (called fragments). Activities are heavier and costlier than fragments, and most apps do not require many activities (in fact many Android applications are single-activity applications).
Our wallet has 3 activities:
- A
Dispatchactivity, which is the entry point of the app. The purpose of the dispatch activity is to launch the user into the proper following activity (eitherWalletorWalletChoice). The dispatch activity checks if the user already has a wallet saved, and if so, launches the wallet directly. If not, it launches theWalletChoiceactivity. - The
WalletChoiceactivity. This is where users can either create a new wallet or recover one from a BIP39 seedphrase. Once a wallet is created (or recovered), it launches theWalletactivity. - The
Walletactivity is where the bulk of the application lives.
We start activities using Intents, as in the following codeblock, which launches the WalletActivity:
// WalletChoiceActivity.kt
val intent: Intent = Intent(this, WalletActivity::class.java)
startActivity(intent)
Task 3: Add fragments to the wallet activity
The WalletActivity is where the magic happens. This 3rd task consists of building empty fragments which do not implement any functionality but provide a skeleton for navigation between them.
Fragments are built by extending the Fragment class, as in:
// WalletFragment.kt
class WalletFragment : Fragment() {
    // ...
}
Note that the Kotlin files for fragments do not contain any layout, buttons, colors, etc. The look of our fragments is defined in their respecive resource files. For example, the layout for the wallet fragment (title, text, and 3 buttons) is defined in res/layout/fragment_wallet.xml. These xml layout resource files are verbose and not easy to parse at first, but ultimately they will remind you of html documents used on the web. Note that there is a new way to define layouts using declarative programming paradigm similar to ReactJS and SwiftUI called JetPack Compose, but it came out of beta a few weeks ago and is not yet the most common way to define UI—although it will without a doubt become the standard before long.
One of the way we interact with the UI elements defined in the xml layout files in our Kotlin code is through view binding. All elements (called views in Android) with a defined id in our layout files will be made available through view binding. We can access and interact with them though that binding variable, as in the following examples:
binding.fragmentTitle.text = "What's up"
binding.syncWallet.setOnClickListener {
    // sync the wallet
}
You’ll find onClickListeners on most of the buttons in the fragments we build.
Navigation
Navigation between the fragments is done through the NavHostFragment. Notice how the activity_wallet.xml layout file is mostly empty but for this navigation host; it is within it that the fragments will live.
<!-- res/layout/activity_wallet.xml -->
<fragment
    android:id="@+id/navHostWallet"
    android:name="androidx.navigation.fragment.NavHostFragment"
    android:layout_width="match_parent"
    android:layout_height="0dp"
    app:defaultNavHost="true"
    app:layout_constraintBottom_toBottomOf="parent"
    app:layout_constraintEnd_toEndOf="parent"
    app:layout_constraintStart_toStartOf="parent"
    app:layout_constraintTop_toBottomOf="@+id/toolbar"
    app:navGraph="@navigation/nav_wallet" >
</fragment>
An important property of this NavHostFragment is the last one: app:navGraph="@navigation/nav_wallet". This property defines where the navigation host will go and fetch the “mapping” for where to navigate and how to do it. Your IDE provides a visualization of the very important nav_wallet.xml file:
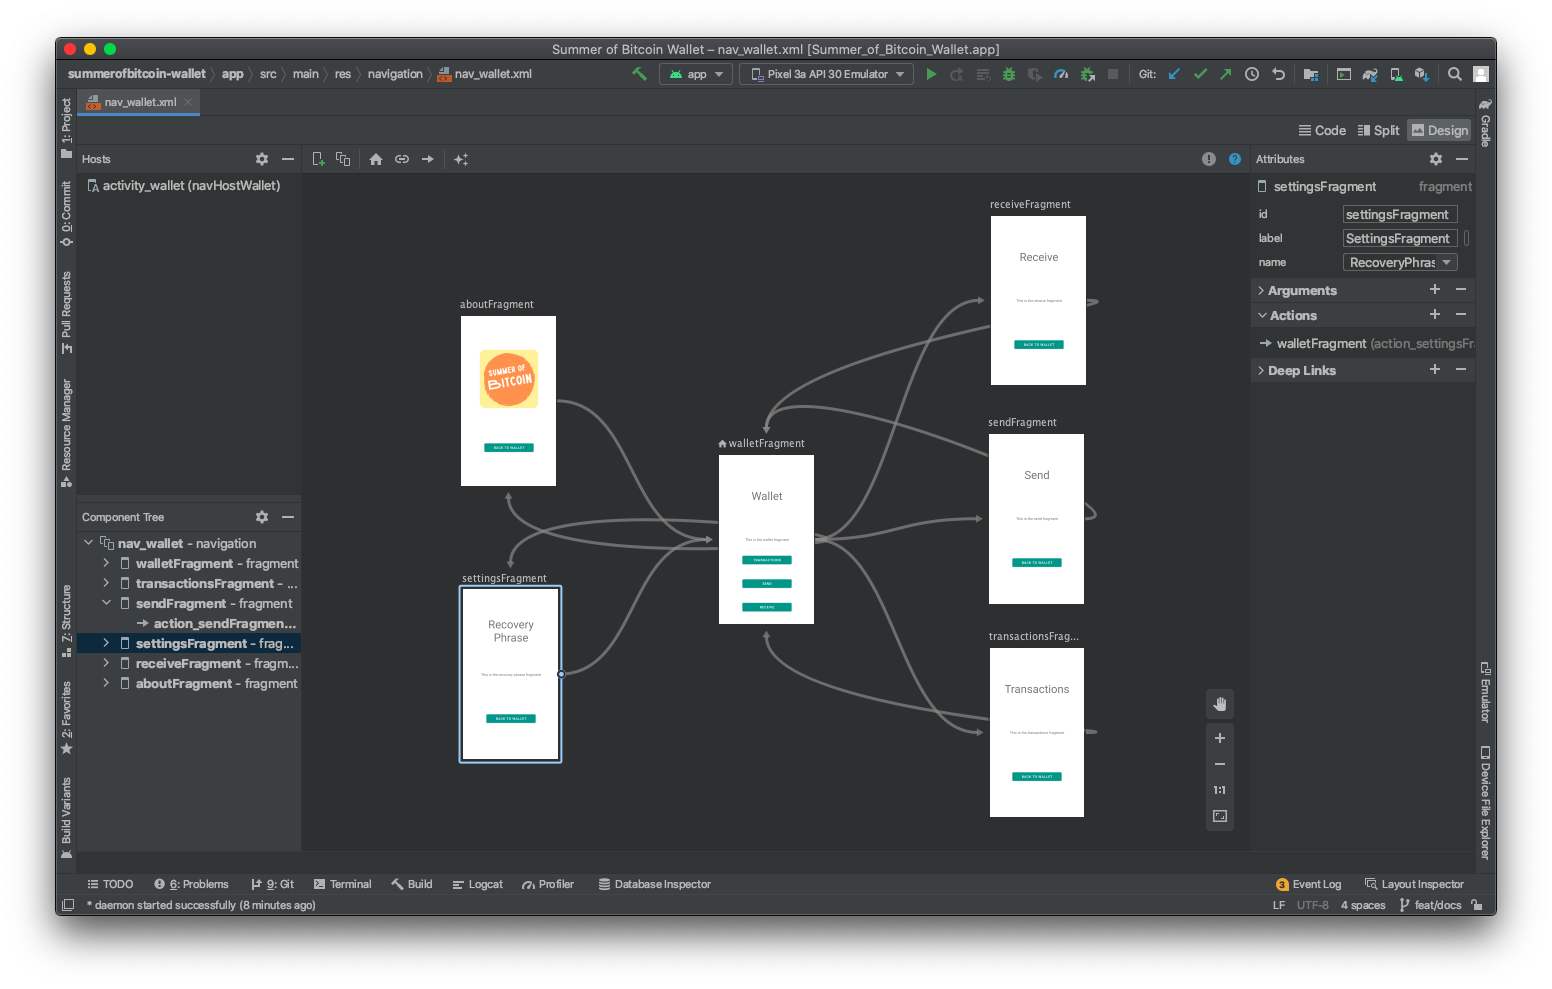
The file contains instructions as to which fragments belong to the NavHostFragment, and the navigation actions between them, including the animations (devined in files under res/anim/). The screens in the IDE visualization correspond to the <fragment> tags in the xml file and the arrows correspond to the <action> tags in the xml file.
Note that resources are accessed using the following syntax: @resourcetype/resourceId. For example, the slide_in_left.xml animation in the /res/anim/ directory is accessed below using app:enterAnim="@anim/slide_in_left". We define an id for an element using the @+id syntax, as in android:id="@+id/sendFragment"
<!-- res/navigation/nav_wallet.xml -->

<!-- ... -->

<fragment
    android:id="@+id/sendFragment"
    android:name="org.summerofbitcoin.wallet.SendFragment"
    android:label="SendFragment"
    tools:layout="@layout/fragment_send">
    <action
        android:id="@+id/action_sendFragment_to_walletFragment"
        app:destination="@id/walletFragment"
        app:enterAnim="@anim/slide_in_left"
        app:exitAnim="@anim/slide_out_right" />
</fragment>

<!-- ... -->
Task 4: Build the target UI
The UI we’ll be building is simple with a clean color palette. The wireframes that were used to develop the original idea were made using a tool called Figma and look like this:
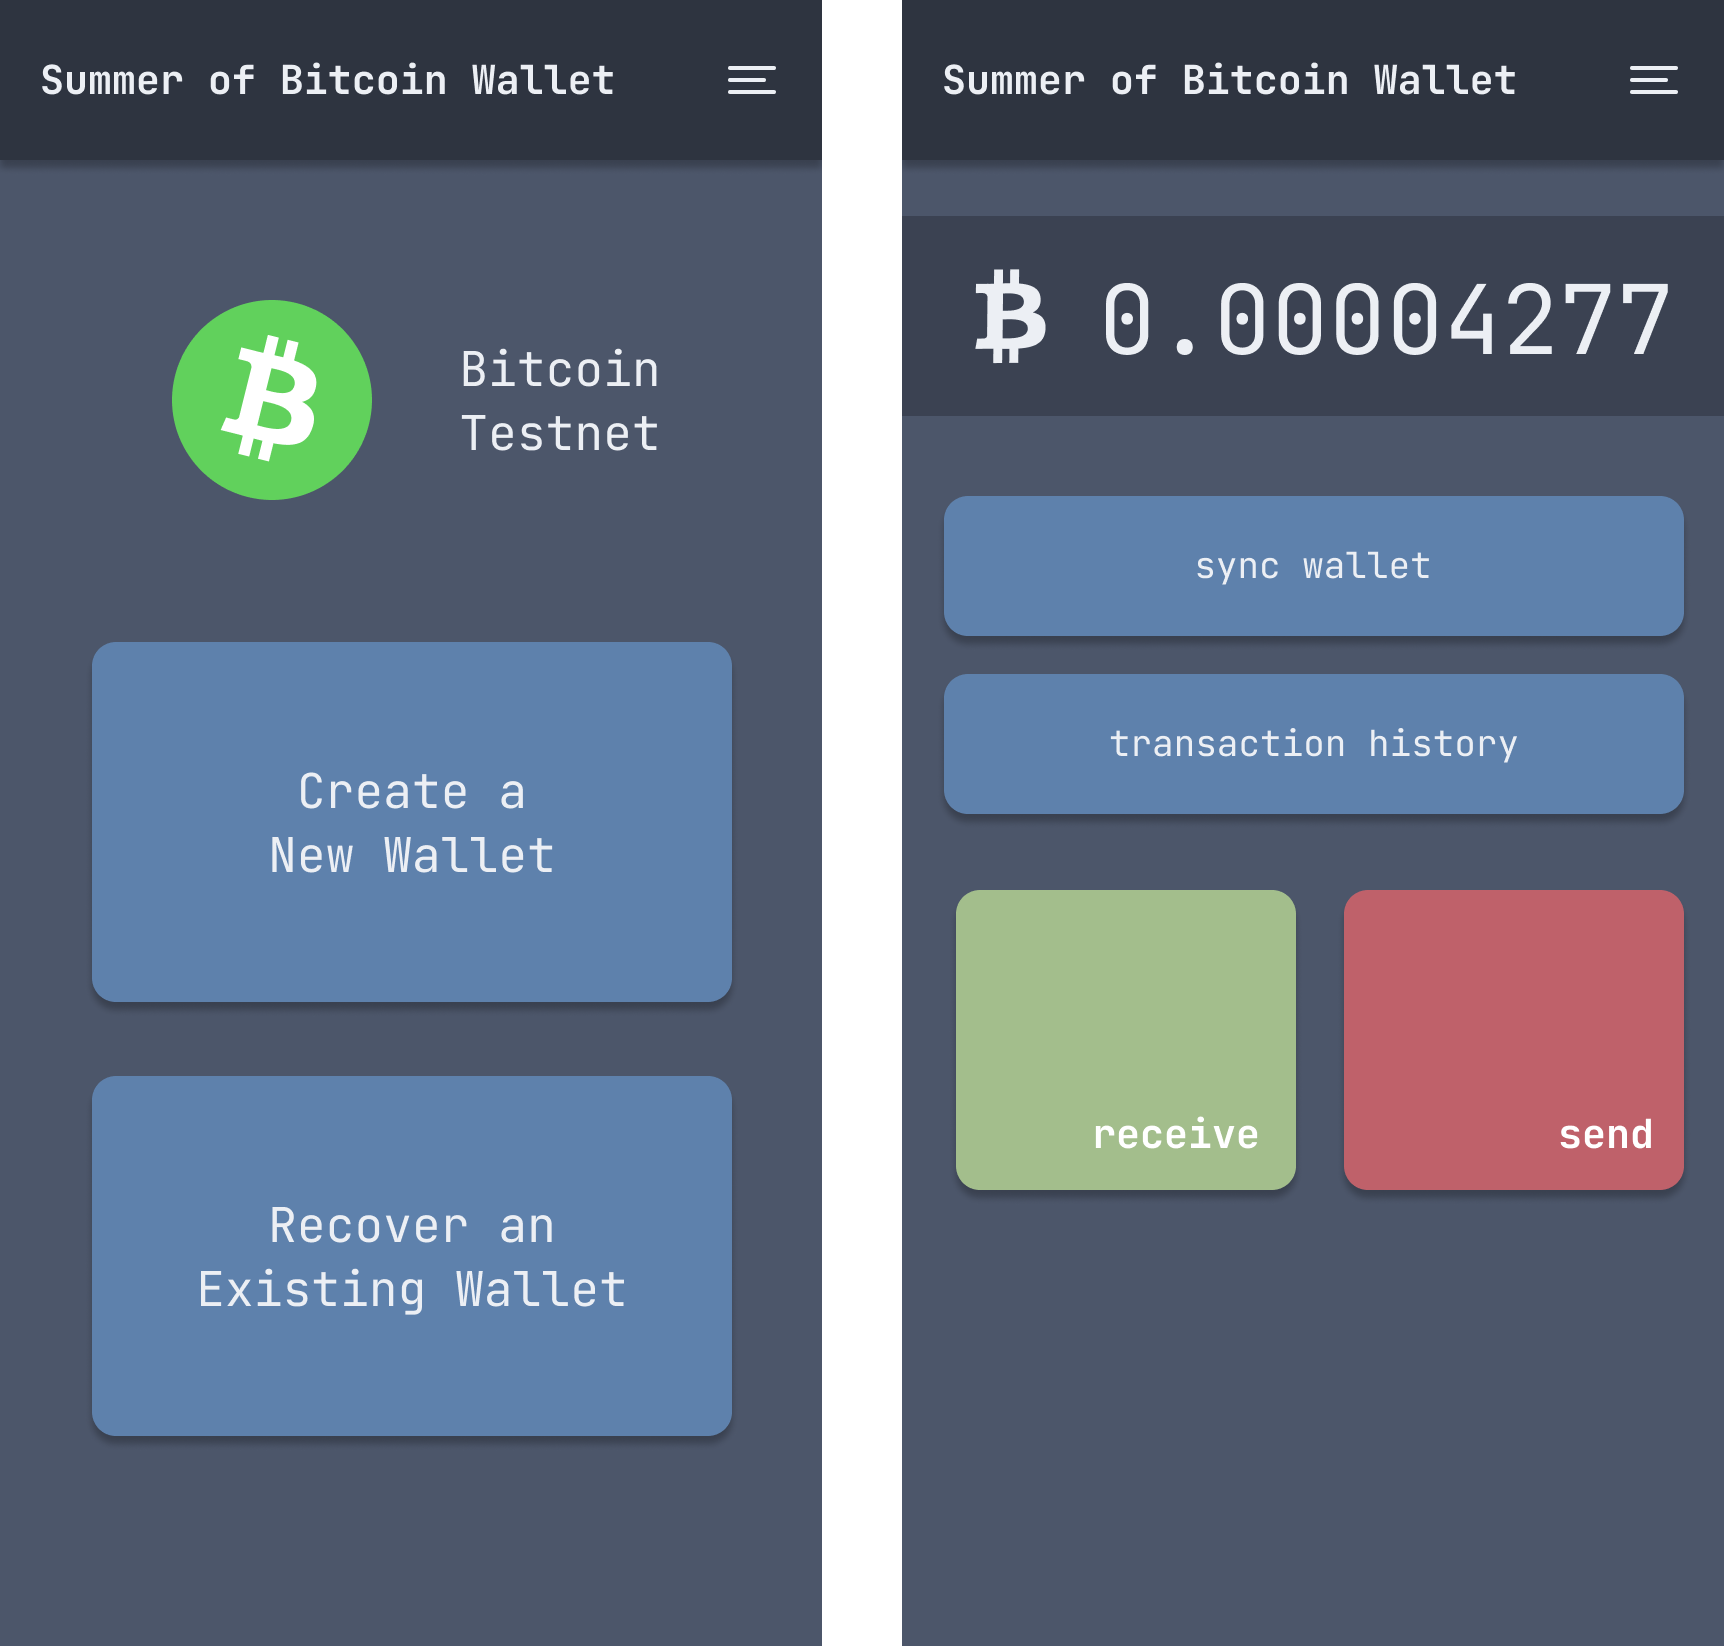
The color palette is from a theme called Nord.
Most of the work in developing the UI happens in the res/layouts/ directory. Buttons and textviews are xml tags and are given properties that define how they look as well as their location on the screen. Most fragments use a ConstrainLayout tag as their parent tag, which allows for views inside it to describe how to space themselves on different screen sizes.
When learning about how to build UIs in Android Studio, make sure you try the different options for view panes (code, split, and design). Some tasks are better suited to certain workflows.
Colors
Our colors are defined in the res/values/colors.xml file, and become accessible throughout the app using calls like android:background="@color/night_1"
Strings
You’ll note that while you can write string directly inside views in your layouts, your IDE will recommend you pull them out in string resources. Doing this feels odd at first, but scales much better. The same string is then defined only once and can be used in multiple places (only one place to change it if it needs change). This approach also offers the opportunity to add translations in different directories, and allows your app to pull the right resource given the user’s locale and/or preferred language.
Image assets
The testnet bitcoin logo (an svg file) is added to the res/drawable/ directory. This directory is where you’ll find most images, logos, and background shapes that are used in other views.
Styles
It is often useful to define certain properties that can be applied broadly to many views. Android has a theming system that allows you to define new themes or extend the default one provided by Android. The app uses a bit of both. Take a look at the res/values/themes.xml file. Note that activities can be given a theme in the AndroidManifest.xml file; this is how we build the splash screen for the app (by providing a theme which has a single background image to the DispatchActivity activity).
Task 5: Add Wallet and Repository objects
This is where things get interesting on the bitcoin side of things. This task introduces 2 new objects: the Wallet object and the Repository object.
Both are initialized on startup by the SobiWalletApplication class, with some properties they need to function (wallet path and shared preferences respectively).
Wallet object
The Wallet class is our window to the bitcoindevkit. It’s the only class that interacts with the bitcoindevkit direclty and you’ll find in there most of the API. Methods like createWallet(), loadExistingWallet(), and recoverWallet() allow you to generate/recover wallets on startup, and methods like sync(), getNewAddress(), and getBalance() provide the necessary interactions one would expect from a bitcoin library.
Note that because the bitcoindevkit is a native library (it is not written in Kotlin/Java and is provided as binaries to the OS), the library get “loaded” on initialization through the init block:
object Wallet {
    private val lib: Lib

    init {
        // load bitcoindevkit native library
        Lib.load()
        lib = Lib()
    }
    // ...
}
The library is then accessible throughout the class, and most methods use it like so:
fun getNewAddress(): String {
    return lib.get_new_address(walletPtr)
}

fun getBalance(): Long {
    return lib.get_balance(walletPtr)
}
The library comes with a few types (ExtendedKey, CreateTxResponse, SignResponse, etc.) which can be investigated by looking at the source code here.
Repository object
The Repository design pattern is very common in Android applications. The idea is to create a layer of separation between the UI (activities, fragments) and the data they need to function. A Repository class is often used as the bridge between the two. For example, a fragment might need to query a list of friends the user has, and that list might be available from different locations (say a ping to a microservice, or a lookup in a local cache). It’s important to pull that sort of decision/code away from UI fragments. This is typically the sort of thing that the Repository will do; make decisions as to where and how to get data for the UI fragments that request it.
For us this shows up when the DispatchActivity tries to decide if the user already has a wallet initialized upon launch. In this case the activity simply asks the Repository the question
Repository.doesWalletExist()
and doesn’t care how the Repository knows (in this example the repository uses a boolean value stored in shared preferences). Shared preferences are a way to store small amounts of data quickly without requiring a database. Common use cases are small strings and booleans (like choice of color theme, whether something has been completed, etc.).
Using the bitcoindevkit
We can see the library in action through the logs, for example when creating a new wallet, or when pressing the new generateNewAddressButton on the receive fragment:
binding.generateNewAddressButton.setOnClickListener {
    Log.i("SobiWallet", "${Wallet.getNewAddress()}")
}
Task 6: Implement receive and sync
It’s now time to connect the Wallet object to the user interface. Note how the generateNewAddressButton has on onClickListener that triggers the displayNewAddress() method:
// ReceiveFragment.kt

override fun onViewCreated(view: View, savedInstanceState: Bundle?) {
    super.onViewCreated(view, savedInstanceState)

    val navController = Navigation.findNavController(view)
    binding.receiveToWalletButton.setOnClickListener {
        navController.navigate(R.id.action_receiveFragment_to_walletFragment)
    }
    binding.generateNewAddressButton.setOnClickListener {
        displayNewAddress()
    }
}

private fun displayNewAddress() {
    val newGeneratedAddress: String = Wallet.getNewAddress()
    Log.i("SobiWallet", "New deposit address is $newGeneratedAddress")

    val qrgEncoder: QRGEncoder = QRGEncoder(newGeneratedAddress, null, QRGContents.Type.TEXT, 1000)
    qrgEncoder.colorBlack = ContextCompat.getColor(requireContext(), R.color.night_1)
    qrgEncoder.colorWhite = ContextCompat.getColor(requireContext(), R.color.snow_1)
    try {
        val bitmap = qrgEncoder.bitmap
        binding.qrCode.setImageBitmap(bitmap)
    } catch (e: Throwable) {
        Log.i("SobiWallet", "Error with QRCode generator, ${e.toString()}")
    }
    binding.receiveAddress.text = newGeneratedAddress
}
The displayNewAddress() method calls Wallet.getNewAddress() and uses the bindings on the qrCode (an image) and receiveAddress (text) views to populate the screen with the proper address.
QR codes
QR codes are generated using a library called zxing (you’ll find the new dependency in the /app/build.gradle.kts file).
Sync
The sync functionality is very simple (a simple Wallet.sync() will do). But note that we wish to update the UI to reflect the current balance upon sync. This is done using something called the viewmodel, a very common pattern in Android applications. ViewModels are a way to implement the observer pattern.
Take a look at the WalletViewModel class:
class WalletViewModel(application: Application) : AndroidViewModel(application) {

    public var balance: MutableLiveData<Long> = MutableLiveData(0)

    public fun updateBalance() {
        Wallet.sync(100)
        val newBalance = Wallet.getBalance()
        Log.i("SobiWallet", "New balance is $newBalance")
        balance.postValue(newBalance)
    }
}
Fragment and activities can simply “observe” (subscribe to) particular variables in our ViewModel, and the ViewModel will update them as this value changes. Notice the balance.postValue(newBalance) call (this triggers all observers to pull the new data).
The code from the fragment looks like this:
viewModel.balance.observe(viewLifecycleOwner, {
    val balanceInBitcoin: Float
    if (it == 0L) {
        balanceInBitcoin = 0F
    } else {
        balanceInBitcoin = it.toFloat().div(100_000_000)
    }
    val humanReadableBalance = DecimalFormat("0.00000000").format(balanceInBitcoin)
    binding.balance.text = humanReadableBalance
})
This ensures that the balance displayed in the balance view is always up to date with the balance in the WalletViewModel. Easy Peasy Bitcoineesy.

Task 7: Implement send
Sending bitcoin is a slightly more involved operation.
The bitcoindevkit workflow for this operation is as follows:
- Create a transaction with proper data (amount, fee rate, adressees)
- Sign the transaction
- Extract the raw transaction
- Broadcast it
Note that all 4 of those steps are accomplished by the broadcastTransaction() method of the SendFragment:
private fun broadcastTransaction() {
    try {
        // build required transaction information from text inputs
        val feeRate = 1F
        val sendToAddress: String = binding.sendToAddress.text.toString().trim()
        val sendAmount: String = binding.sendAmount.text.toString().trim()
        val addressAndAmount: List<Pair<String, String>> = listOf(Pair(sendToAddress, sendAmount))

        val transactionDetails: CreateTxResponse = Wallet.createTransaction(feeRate, addressAndAmount, false, null, null, null)
        val signResponse: SignResponse = Wallet.sign(transactionDetails.psbt)

        val rawTx: RawTransaction = Wallet.extractPsbt(signResponse.psbt)
        val txid: Txid = Wallet.broadcast(rawTx.transaction)

        Log.i("SobiWallet", "Transaction was broadcast! txid: $txid")
        showSnackbar(
            requireView(),
            SnackbarLevel.SUCCESS,
            "Transaction was broadcast successfully!"
        )
    } catch (e: Throwable) {
        Log.i("SobiWallet", "Broadcast error: ${e.message}")
        showSnackbar(
            requireView(),
            SnackbarLevel.ERROR,
            "Broadcast error: ${e.message}"
        )
    }
}
The other parts of this fragment are the MaterialAlertDialog (which we use as a confirmation step before broadcasting the transaction):
val broadcastTransactionDialog =
    MaterialAlertDialogBuilder(this@SendFragment.requireContext(), R.style.NordDialogTheme)
        .setTitle("Confirm transaction")
        .setMessage(buildConfirmTransactionMessage())
        .setPositiveButton("Broadcast") { _, _ ->
            Log.i("SobiWallet", "User is attempting to broadcast transaction")
            broadcastTransaction()
            navController.navigate(R.id.action_sendFragment_to_walletFragment)
        }
        .setNegativeButton("Go back") { _, _ ->
            Log.i("SobiWallet", "User is not broadcasting")
        }
broadcastTransactionDialog.show()
And the use of snackbars to let the user know whether the transaction has successfully been broadcast of if an error was thrown while attempting to broadcast it.
showSnackbar(
    requireView(),
    SnackbarLevel.ERROR,
    "Broadcast error: ${e.message}"
)
Take a look at utilities/Snackbars.kt to get a sense for how they work.
Task 8: Add transaction history
Adding a list of transactions is a daunting task if one is to take it to a polished result. It involves using a database and keeping track on transactions, their state, and performing calculations on the raw material that the bitcoindevkit provides. This is slightly outside of the scope of this workshop. Simply displaying the list of transactions as one long string (with some small modifications), however, is quite easy, and this is what this wallet implements.
Note that the transactionsView is simply a NestedScrollView that displays a string built by the transactionsList() method. Creating the confirmationTime string variable is the most involved part of this whole endeavor, and is done using a neat Kotlin feature called extension functions, where we define a method on the bitcoindevkit type ConfirmationTime which returns a nicely formatted timestamp. Take a look at the utilities/Timestamps.kt file for more on this function. Building the string is otherwise a rather simple affair; the bitcoindevkit returns a list of TransactionDetails through the listTransactions() method, and we parse them one by one and pull the interesting things into a string template.
override fun onViewCreated(view: View, savedInstanceState: Bundle?) {
    super.onViewCreated(view, savedInstanceState)

    binding.transactionsView.text = transactionList()

    val navController = Navigation.findNavController(view)
    binding.transactionsToWalletButton.setOnClickListener {
        navController.navigate(R.id.action_transactionsFragment_to_walletFragment)
    }
}

private fun transactionList(): String {
    val rawList: List<TransactionDetails> = Wallet.listTransactions()
    var finalList: String = ""
    for (item in rawList) {
        Log.i("SobiWallet", "Transaction list item: $item")
        val confirmationTime: String = item.confirmation_time?.timestampToString() ?: "Pending"
        val transactionInfo: String =
            "Timestamp: ${confirmationTime}\nReceived: ${item.received}\nSent: ${item.sent}\nFees: ${item.fee}\nTxid: ${item.txid}"

        finalList = "$finalList\n$transactionInfo\n"
    }
    return finalList
}
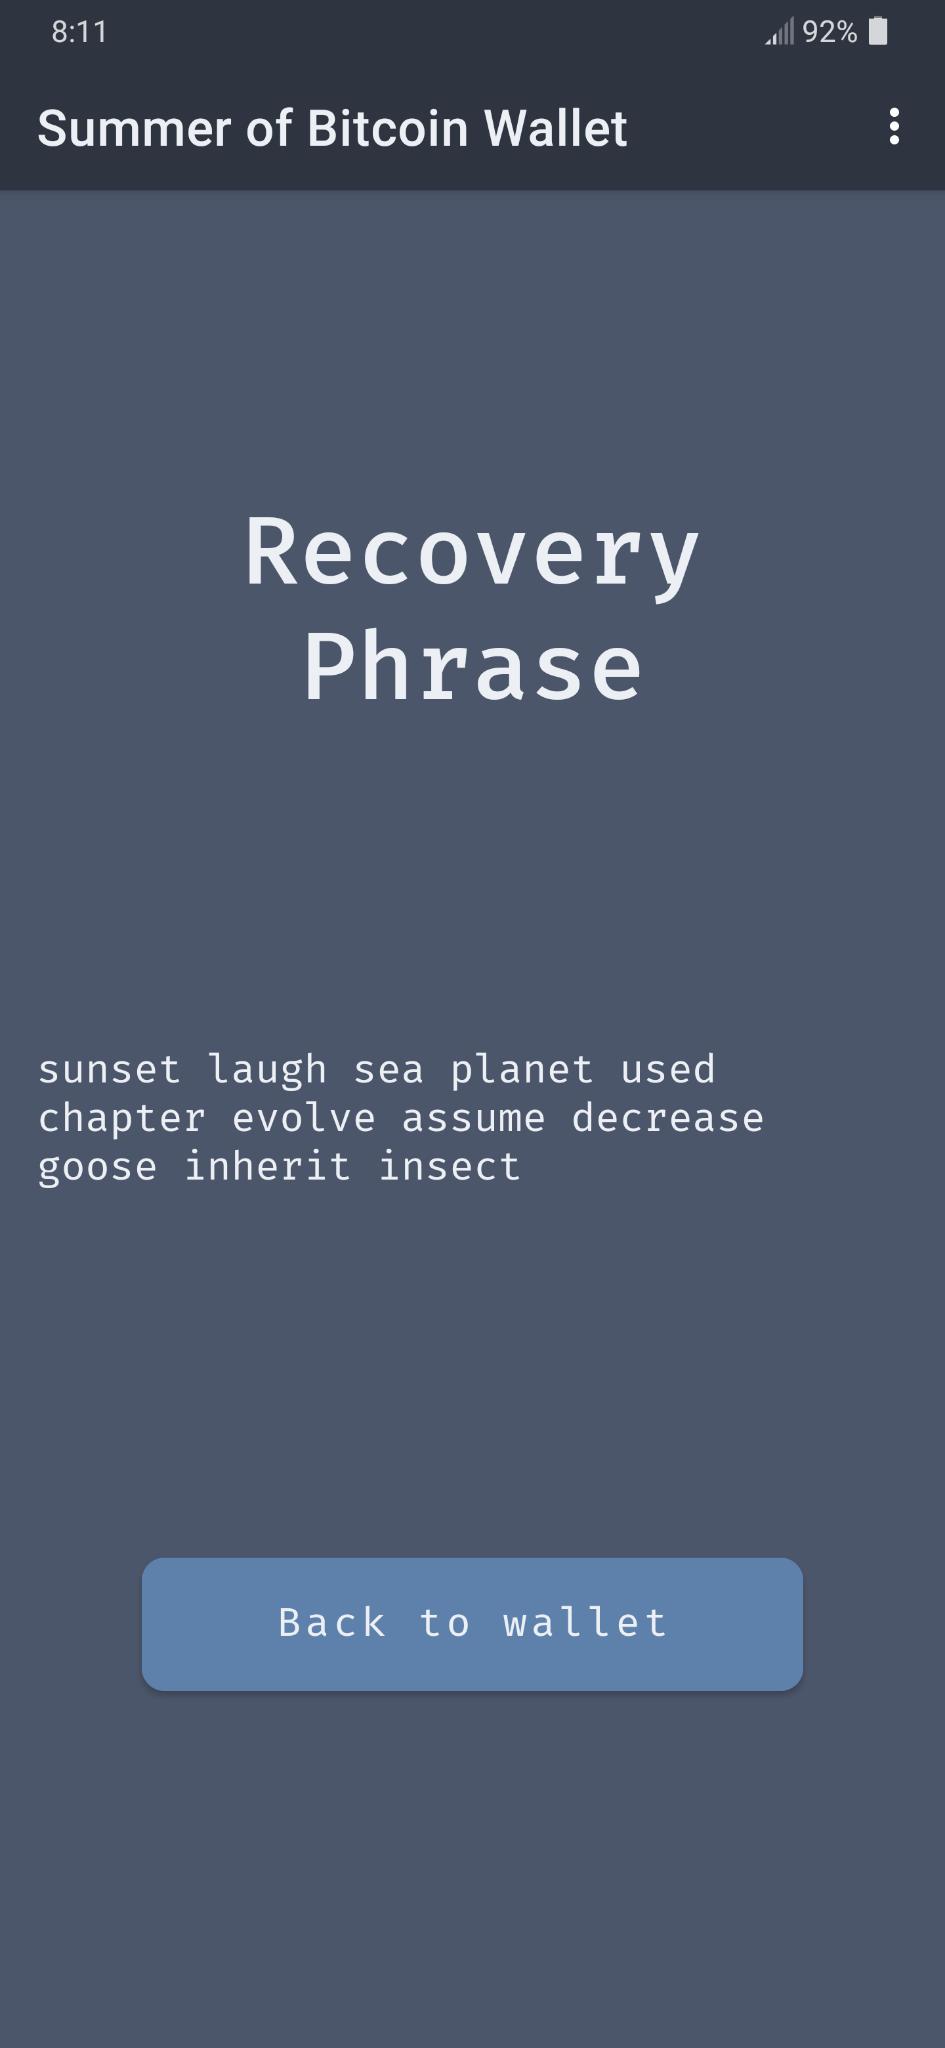
Task 9: Display recovery phrase
Displaying the recovery phrase to the user is not a complicated task. Remember that we have stored the recovery phrase in shared preferences when creating the wallet
fun createWallet(): Unit {
    val keys: ExtendedKey = generateExtendedKey()
    val descriptor: String = createDescriptor(keys)
    val changeDescriptor: String = createChangeDescriptor(keys)
    initialize(
        descriptor = descriptor,
        changeDescriptor = changeDescriptor,
    )
    Repository.saveWallet(path, descriptor, changeDescriptor)
    Repository.saveMnemonic(keys.mnemonic)
}
Retreiving the recovery phrase is a simple call to the repository, which has a getMnemonic() method defined:
fun getMnemonic(): String {
    return sharedPreferences.getString("mnemonic", "No seed phrase saved") ?: "Seed phrase not there"
}
Upon creating the fragment, the getMnemonic() method is simply called to populate the recoveryPhrase text view:
// RecoveryPhraseFragment.kt
override fun onViewCreated(view: View, savedInstanceState: Bundle?) {
    super.onViewCreated(view, savedInstanceState)

    binding.recoveryPhrase.text = Repository.getMnemonic()
}
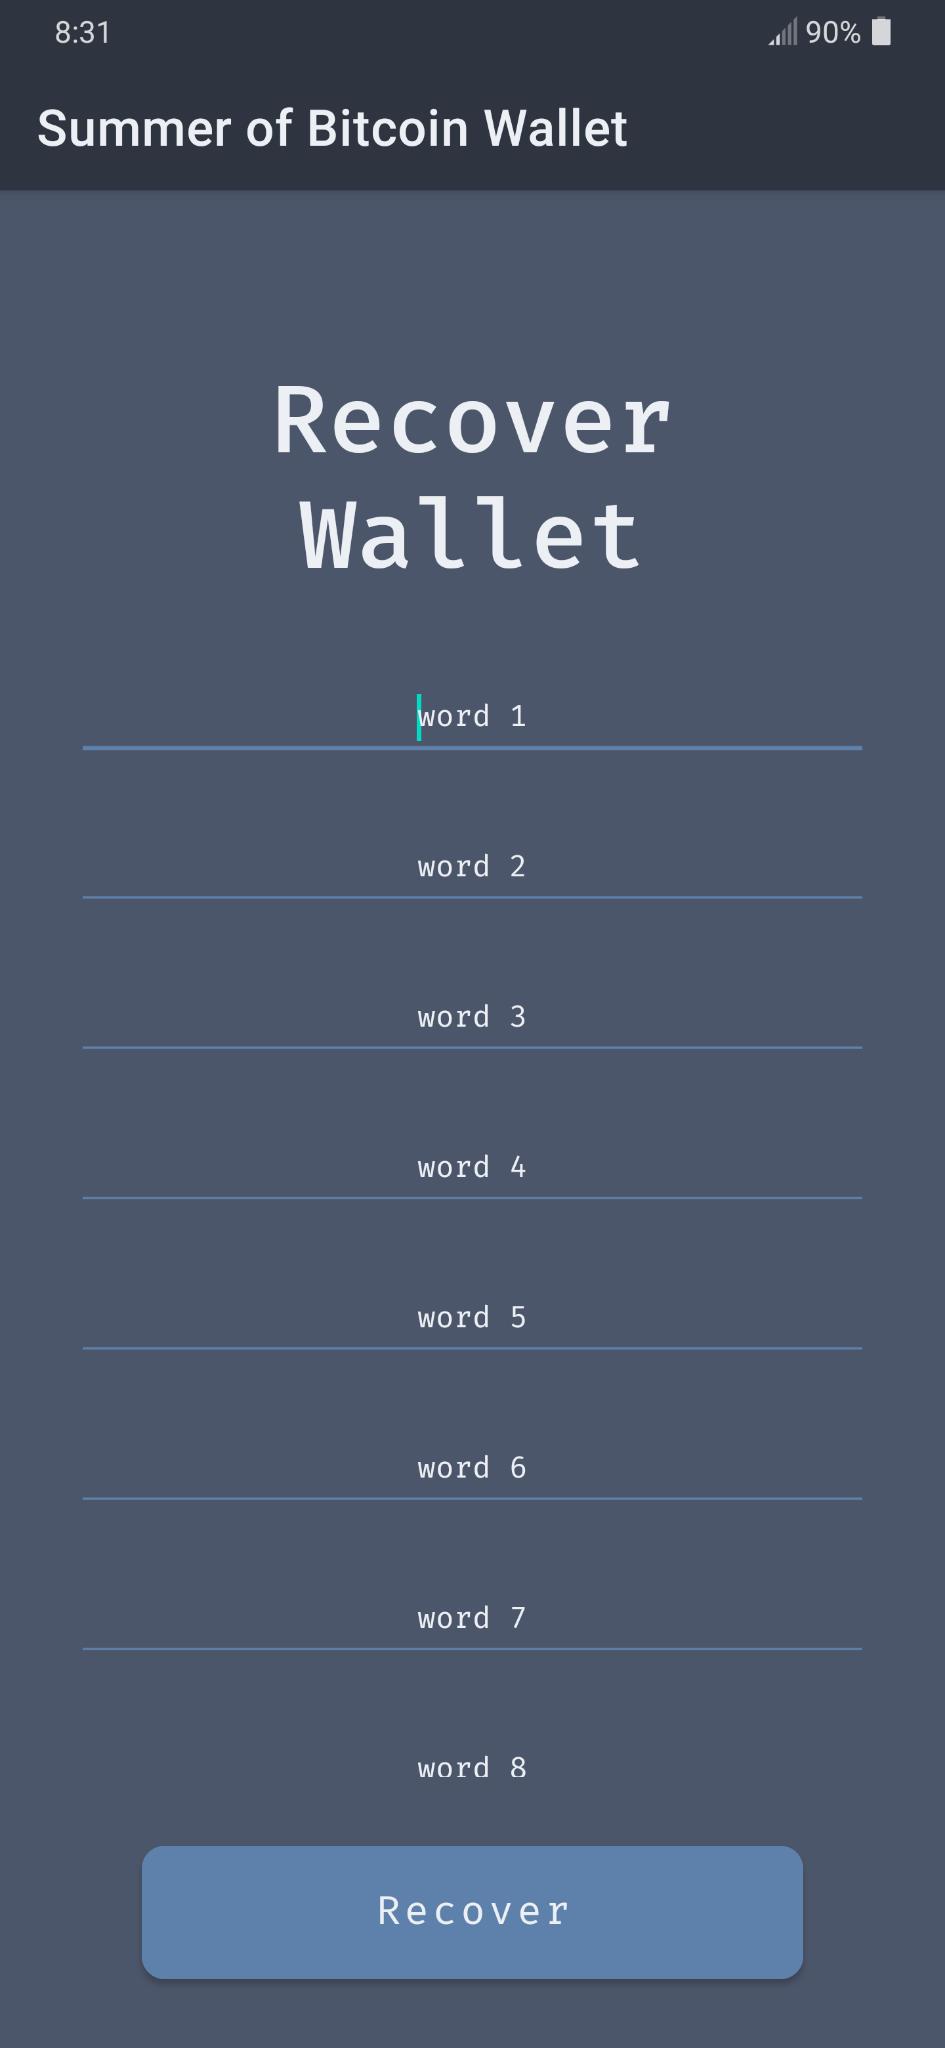
Task 10: Enable wallet recovery
Enabling wallet recovery is not complicated from the bitcoindevkit point of view, but does require a bit of work on the Android side of things. Note for example that so far, the WalletChoiceActivity does not contain any fragments. But here we’ll need to add a screen for entering the 12 word recovery phrase, and so the first thing we need to do is create a NavHostFragment in the WalletChoiceActivity, complete with 2 fragments: our original screen and a wallet recovery screen. We also need to build a nav_wallet_choice.xml file, for navigating between the first and second fragments.
You’ll note that the fragment_recover.xml layout file is a ConstraintLayout with a NestedScrollView, itself containing a LinearLayout which is the parent for all 12 EditText views where the user can input their mnemonic words. This allows for the list of words to be scrollable and ensures it shows well on all screen sizes.
The RecoverWalletFragment is one of our longest Kotlin file, but it really comes down to two methods used in the listener for the recoverWalletButton, namely checkWords() and buildRecoveryPhrase():
// RecoverWalletFragment.kt
binding.recoverWalletButton.setOnClickListener {
    if (checkWords()) {
        val recoveryPhraseString = buildRecoveryPhrase()
        Wallet.recoverWallet(recoveryPhraseString)

        // launch home activity
        val intent: Intent = Intent(this@RecoverWalletFragment.context, WalletActivity::class.java)
        startActivity(intent)
    } else {
        Log.i("SobiWallet", "Recovery phrase was invalid")
    }
}
The checkWords method verifies whether the words provided are (a) not empty, and (b) part of the list of 2048 words defined in the English version of the BIP39 wordlist. It uses error snackbars to let the user know if any of the word inputs has any problems:
private fun checkWords(): Boolean {
    val mnemonicWordsTextViews: List<Int> = listOfNotNull<Int>(
        R.id.word1, R.id.word2, R.id.word3, R.id.word4, R.id.word5, R.id.word6,
        R.id.word7, R.id.word8, R.id.word9, R.id.word10, R.id.word11, R.id.word12,
    )

    for (word in 0..11) {
        val mnemonicWord: String = requireView().findViewById<TextView>(mnemonicWordsTextViews[word]).text.toString()
            .trim().lowercase(Locale.getDefault())
        Log.i("SobiWallet", "Verifying word $word: $mnemonicWord")

        when {
            mnemonicWord.isEmpty() -> {
                Log.i("SobiWallet", "Word #$word is empty!")
                showSnackbar(
                    requireView(),
                    SnackbarLevel.ERROR,
                    "Word #${word + 1} is empty!"
                )
                return false
            }
            mnemonicWord !in this.wordList -> {
                Log.i("SobiWallet", "Word #$word, $mnemonicWord, is not valid!")
                showSnackbar(
                    requireView(),
                    SnackbarLevel.ERROR,
                    "Word #${word + 1} is invalid!"
                )
                return false
            }
            else -> {
                Log.i("SobiWallet", "Word #$word, $mnemonicWord, is valid")
            }
        }
    }
    return true
}
The buildRecoveryPhrase() simply brings all the text inputs into one string, and returns it so it can be used by the Wallet class for the recovery:
// Wallet.kt
fun recoverWallet(mnemonic: String) {
    val keys: ExtendedKey = restoreExtendedKeyFromMnemonic(mnemonic)
    val descriptor: String = createDescriptor(keys)
    val changeDescriptor: String = createChangeDescriptor(keys)
    initialize(
        descriptor = descriptor,
        changeDescriptor = changeDescriptor,
    )
    Repository.saveWallet(path, descriptor, changeDescriptor)
    Repository.saveMnemonic(keys.mnemonic)
}